Your garage door motor is the powerhouse behind your garage door’s smooth opening and closing. Over time, it might stop working correctly due to power surges, obstructions, or sensor issues. In such cases, knowing how to reset garage door motor can save you both time and money. This simple maintenance task often resolves problems without the need for costly repairs.
In this detailed guide, you’ll learn how to reset garage door motor correctly, the tools you need, safety precautions, and when it’s time to call in a professional.
Why You Might Need to Reset a Garage Door Motor
Before learning how to reset garage door motor, it’s important to understand why a reset is necessary. Common reasons include:
- Power interruptions such as blackouts or surges
- Obstruction detection that causes the motor to stop
- Sensor misalignment or malfunction
- Overheating due to frequent use
- Control board glitches or programming errors
A reset can restore the motor’s default settings, allowing the door to operate smoothly again.
Safety Precautions Before Resetting
Before performing how to reset garage door motor, follow these safety tips:
- Disconnect power to the motor to prevent accidents.
- Wear protective gloves to avoid injury.
- Keep children and pets away from the garage area.
- Never reset while the door is in motion.
Tools You May Need
While most resets require minimal tools, it’s useful to have:
- A sturdy ladder
- Screwdriver set
- User manual for your garage door opener
- Flashlight (if working in a dimly lit area)
Step-by-Step: How to Reset Garage Door Motor
Resetting your garage door motor depends on the brand and model, but most follow similar steps.
Step 1: Locate the Motor Unit
The motor is usually mounted on the ceiling in the center of the garage. Identify the brand and model to ensure you follow the correct reset procedure.
Step 2: Unplug the Opener
Unplugging the unit cuts off power, ensuring safety during the reset process. Some units also have a dedicated power switch.
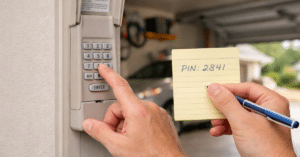
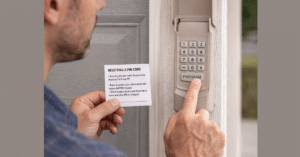
Step 3: Press the Reset Button
Many motors have a small reset or learn button.
- For LiftMaster, Chamberlain, or Craftsman, this is often near the back or side of the motor housing.
- Hold the button for 5–10 seconds until the LED light blinks, signaling a reset.
Step 4: Reconnect Power
Plug the motor back in. The unit should now be in default mode.
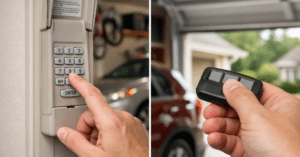
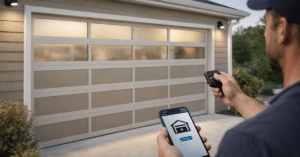
Step 5: Reprogram Remote Controls
After you reset the motor, remotes and keypads must be reprogrammed.
- Press the learn button again until the LED blinks.
- Within 30 seconds, press the button on your remote.
- The LED will flash to confirm pairing.
Step 6: Test the Door
Open and close the garage door to ensure the reset was successful. If problems persist, further troubleshooting may be needed.
Troubleshooting After Reset
Even after performing how to reset garage door motor, some issues may remain. Here’s how to address them:
1. Door Won’t Close Completely
- Check for sensor alignment. Misaligned safety sensors can stop the door mid-cycle.
- Clean sensor lenses to remove dirt or debris.
2. Motor Runs but Door Doesn’t Move
- Inspect the drive belt or chain for wear or damage.
- Make sure the emergency release cord hasn’t been pulled.
3. Door Reverses Unexpectedly
- Adjust the travel limits on the motor.
- Remove obstructions from the door’s path.
Reset Methods by Popular Brands
LiftMaster
- Unplug the motor.
- Hold the learn button for 6–10 seconds.
- Reconnect power and reprogram remotes.
Genie
- Press and hold the program button until the LED flashes.
- Press the remote button twice.
- Confirm reset by testing door movement.
Chamberlain
- Disconnect power.
- Press learn until LED goes out.
- Reconnect power and program devices.
When to Call a Professional
If you’ve followed all how to reset garage door motor steps and the problem persists, professional help may be necessary. Call a garage door technician if:
- The motor emits burning smells or unusual noises
- The door is stuck halfway despite resets
- There are visible frayed cables or damaged springs
Tips to Prevent Frequent Resets
- Regular maintenance – Lubricate moving parts and check alignment quarterly.
- Surge protection – Install a surge protector to guard against power spikes.
- Limit overuse – Avoid opening/closing the door excessively in a short period.
- Keep sensors clean – Dirt and dust can trigger unnecessary stops.
FAQs About How to Reset Garage Door Motor
Q1: How often should I reset my garage door motor?
Only when necessary—frequent resets may indicate a deeper issue.
Q2: Will resetting erase all settings?
Yes, most resets restore factory defaults, requiring you to reprogram remotes and keypads.
Q3: Can I reset without a ladder?
If your opener is ceiling-mounted, a ladder is usually required for safe access.
Conclusion
Learning how to reset garage door motor is a valuable skill that can save time, money, and frustration. With the right tools, safety measures, and step-by-step guidance, most homeowners can perform a reset in just a few minutes. However, persistent issues after a reset may indicate mechanical problems requiring professional repair.
By following this guide, you not only restore smooth operation but also extend the life of your garage door system. Whether you own a LiftMaster, Genie, or Chamberlain, understanding the reset process is an essential part of garage door maintenance.